HPTLC PRO
Fully automated sample analysis and evaluation system for routine quality control
Fully automated sample analysis and evaluation system using HPTLC plates (20 x 10 cm). The HPTLC PRO SYSTEM (patented technology) is best suited for routine quality control of analytes extracted from complex matrices, providing reproducible and reliable results. It supports up to 75 samples, up to five plates, and up to three independent developing solvents without intervention. The possibility of derivatization, MS coupling, and plate storage are included.
Status colors
HPTLC PRO SYSTEM status
The status of a HPTLC PRO SYSTEM is represented by a backgound color in HPTLC PRO SYSTEM status, HPTLC PRO SYSTEM Configuration and HPTLC PRO SYSTEM Details:
Normal color: HPTLC PRO SYSTEM is ready
Gray: HPTLC PRO SYSTEM is disabled
Orange: HPTLC PRO SYSTEM is not available because at least one HPTLC PRO Module is blocked (no air pressure, door open, instrument error, etc.)
Red: HPTLC PRO SYSTEM is not available because at least one HPTLC PRO Module is not connected
Magenta: HPTLC PRO SYSTEM is not available because it is locked by HPTLC PRO SYSTEM supervisor
HPTLC PRO Module status
The status of HPTLC PRO Modules corresponds to the main LED button on the instrument:
White: initialization
Blue: busy (conveyor, feeder, or executing a step)
Red: error
Blue (blinking): recovery
Cyan: air pressure low or door opened
Green: ready
Conveyor Manager
visionCATS includes a new component inside the visionCATS Server called the Conveyor Manager, which is designed to manage the HPTLC PRO SYSTEM:
It controls the validity of the HPTLC PRO SYSTEM defined in the visionCATS installation:
A HPTLC PRO Module can belong to only one HPTLC PRO SYSTEM.
A HPTLC PRO SYSTEM can’t contain several HPTLC PRO Modules of same type. Supporting this could be possible in a later version.
It contains a state machine that:
Computes and executes the moves based on the runs added to the sequence and resolves moves conflicts.
Performs the initialization of the HPTLC PRO SYSTEM to determine its availability and raises errors (see Understanding the HPTLC PRO Module and HPTLC PRO SYSTEM initialization).
Finds and keeps track of the carriers present across the HPTLC PRO SYSTEM.
Tries to recover the execution of the runs after some events such as a door opened or a disconnection of an instrument.
It features a history where all events related to the initialization of the HPTLC PRO SYSTEM and the execution of the runs are stored.
It includes a Diagnostics part which checks that the instruments of the HPTLC PRO SYSTEM are correctly positioned.
Analysis splitting in HPTLC/TLC steps and HPTLC PRO runs
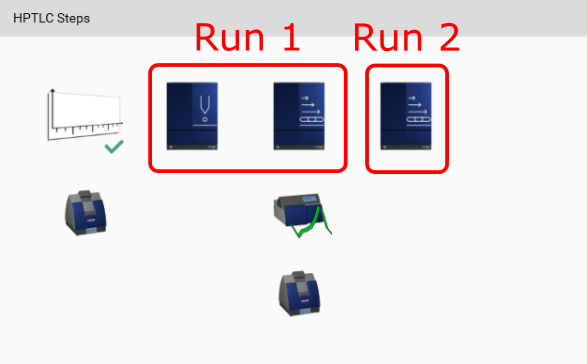
The execution of the analysis will include:
The execution of the TLC Visualizer 2 clean step (HPTLC/TLC step)
The execution of the Run 1 as a group containing 2 moves: one for the HPTLC PRO APPLICATION step and one for the HPTLC PRO DEVELOPMENT step.
The execution of the TLC Scanner 4 and TLC Visualizer 2 steps (HPTLC/TLC steps)
The execution of the Run 2 containing 1 move for the HPTLC PRO DEVELOPMENT step.
The execution of the TLC Visualizer 2 step (HPTLC/TLC step)
visionCATS automatically splits the execution of the analysis in HPTLC/TLC step execution and HPTLC PRO Run executions. Of course, there can’t be several simultaneous runs for the same analysis and each Run requires the plate to be placed in a carrier, loaded on the left of the HPTLC PRO SYSTEM and then unloaded in the end on the right (even if the run consist in one single step).
Execution
In the analysis view, the runs are added to a sequence of an HPTLC PRO SYSTEM. The runs placed in the same sequence are compatible in term of consumables and there are up to 5 runs pro sequence (if there is enough place for all vials in the rack). Then the HPTLC PRO SYSTEM Supervisor will start a sequence in the HPTLC PRO SYSTEM Details view. He will have to prepare consumables (see Consumables check) before he can start the execution.
Note
An HPTLC PRO SYSTEM will handle alone up to 5 runs (5 different analyses) automatically, only plate loading and unloading need to be manual done.
Understanding the HPTLC PRO Module and HPTLC PRO SYSTEM initialization
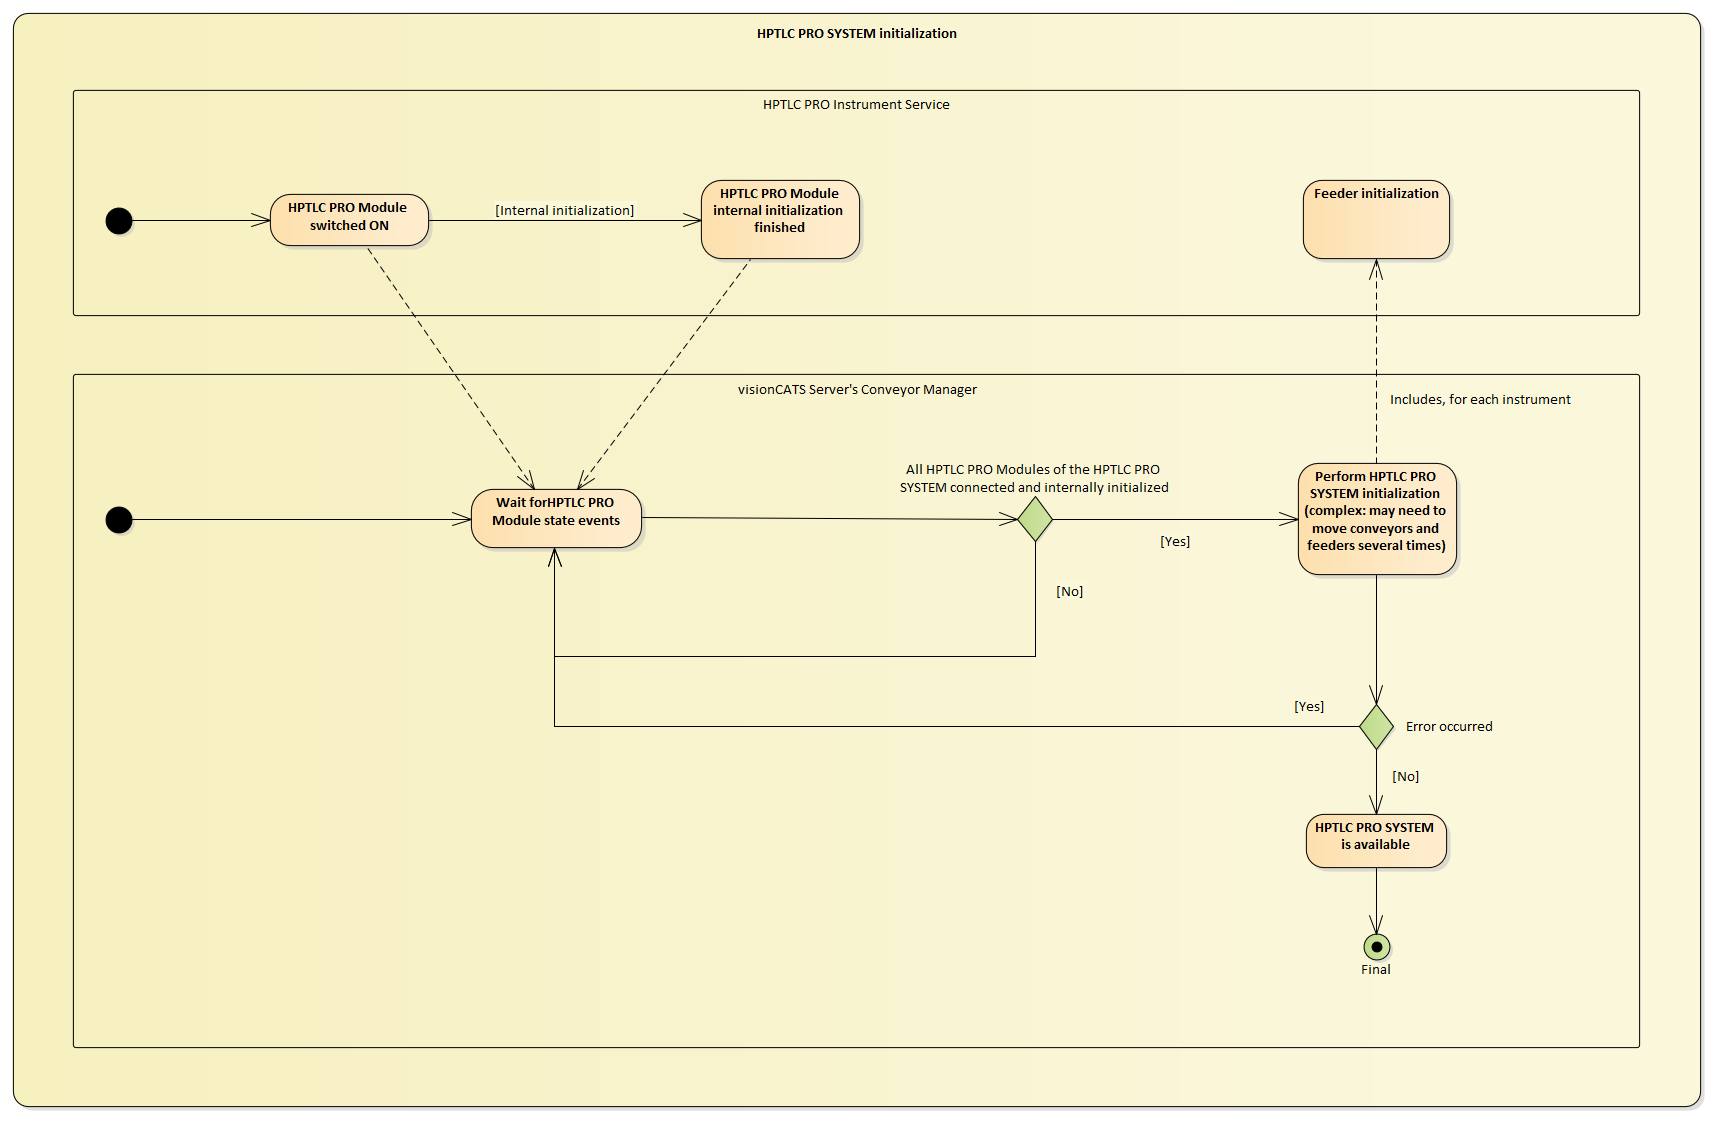
Before using HPTLC PRO Modules in HPTLC PRO SYSTEM by using visionCATS, 2 initialization steps must be performed:
Internal initialization of each HPTLC PRO Module: when a HPTLC PRO Module is switched on or reset, it begins its internal initialization immediately. Depending on the instrument, this initialization can take some time, for example when the HPTLC PRO DEVELOPMENT instrument cleans the chamber at startup. At the end of this internal initialization, the feeder is still not initialized, and the LED button of the HPTLC PRO Module is still white, meaning that the HPTLC PRO Module is not fully initialized.
If all the internal initializations of the instruments of a given HPTLC PRO SYSTEM are finished, the Conveyor Manager begins the HPTLC PRO SYSTEM initialization. Depending on the current conveyor and feeder states across the HPTLC PRO SYSTEM, it finishes the initialization of each HPTLC PRO Module by initializing their feeder (may be not needed on reconnection) without breaking eventual carriers who are on the conveyor or on the feeder. In some cases, this can require several movements of the conveyor and the feeder until reaching the point where the Conveyor Manager has:
Initialized the feeder of all HPTLC PRO Modules in the HPTLC PRO SYSTEM
Determined the exact position and the ID (RFID) of all carriers in the HPTLC PRO SYSTEM.
The LED Button of the HPTLC PRO Module switches from white to green once its feeder is initialized. It is now fully initialized, but the Conveyor Manager still may have to perform feeder/conveyor moves on this instrument to complete the HPTLC PRO SYSTEM initialization.
Important
The HPTLC PRO SYSTEM initialization is triggered when:
All HPTLC PRO Modules of the HPTLC PRO SYSTEM are connected
All HPTLC PRO Modules’ internal initialization are finished
All doors are closed
The HPTLC PRO SYSTEM is online and not locked
The HPTLC PRO SYSTEM is automatically disabled in case of an error during the HPTLC PRO SYSTEM initialization. This allows the user to resolve the problem before reenabling the HPTLC PRO SYSTEM to retry the HPTLC PRO SYSTEM initialization.
HPTLC PRO SYSTEM reset
A HPTLC PRO SYSTEM reset can be executed when the HPTLC PRO SYSTEM is in a critical state. It:
Aborts any executing step
Removes any in-progress or added to sequence run of the HPTLC PRO SYSTEM
Performs a result of each Module of the HPTLC PRO SYSTEM
Initializes the HPTLC PRO SYSTEM again automatically (see Understanding the HPTLC PRO Module and HPTLC PRO SYSTEM initialization)
Therefore, a validation popup is used to prevent any unwanted reset. Also, the need to write the name of HPTLC PRO SYSTEM to validate the reset will prevent reseting the wrong system in case of multiple systems.
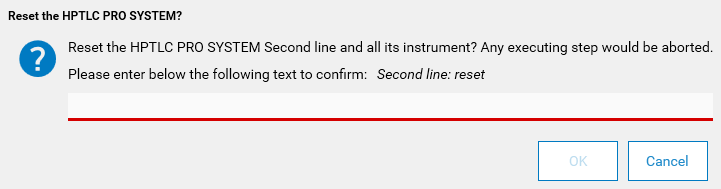
This will also modify any corresponding opened analyses. The running step(s) are just be marked as aborted, and the user has to abort the step(s) in the analyis before trying again when the HPTLC PRO SYSTEM is available.
Important
Before restarting the step(s), the user should verify the state of the HPTLC plate, as the reset may have put it in an unusable state. In most cases, it is better to start again the whole analysis.

Consumables validation
As HPTLC PRO is geared towards automation, the consumables of the HPTLC PRO Modules, such as the rack of the HPTLC PRO APPLICATION or the solvents of the HPTLC PRO DEVELOPMENT instruments, must be defined and managed by visionCATS. This allows visionCATS to check if all consumables are present prior to the execution of a sequence.
Consider the HPTLC PRO Module. In the properties of the instrument, visionCATS users can define the current state of the consumables, for example to define the solvent name of the 1st bottle of the HPTLC PRO DEVELOPMENT instrument.
Then, consider an analysis. The Chromatography tab defines as usual the:
The vials in the Track Assignment,
The solvent names in step parameters.
More over, the vials are assigned to a rack when the run is added to a sequence. So the rack of a sequence is configured during the add of the runs to the latter.
This defines what the run will do, not how. In other words, the analysis parameters do not depend on the HPTLC PRO Modules which will execute the steps. The matching can only be done when the sequence is started on a connected HPTLC PRO SYSTEM. visionCATS can then associate each analysis step with the corresponding HPTLC PRO Module to establish how the runs can be performed.
For example, if a HPTLC PRO DEVELOPMENT step requires the Dichloromethane mobile phase, visionCATS searches through the bottles of the HPTLC PRO DEVELOPMENT instrument if Dichloromethane is present:
If found, then Dichloromethane is associated to the corresponding bottle
If not found, then the consumables popup is shown to the user to help him fulfill the requirements.
This way, visionCATS checks all the consumables before the run is started:
HPTLC PRO APPLICATION:
Check step’s Fluid 1 solvent name <-> Module’s Bottle 1 content
Check step’s Fluid 2 solvent name <-> Module’s Bottle 2 content
HPTLC PRO DEVELOPMENT:
Check if step’s Preconditioning solvent corresponds to one of the Module’s bottle (Bottle 1 content, Bottle 2 content, Bottle 3 content)
Same for step’s Development solvent
Same for step’s Conditioning solution
Check if step’s Activation salt solution <-> Module’s Activation bottle content
Consumables check
Before adding a run to a sequence, an information is displayed in the Instruction display if the Module does not have the needed consumables. It is only display as information because the sequence may be executed later, after a change of consumables.

The real check is made when executing the run(s). If something does not match, a Needed consumables for execution popup is displayed.
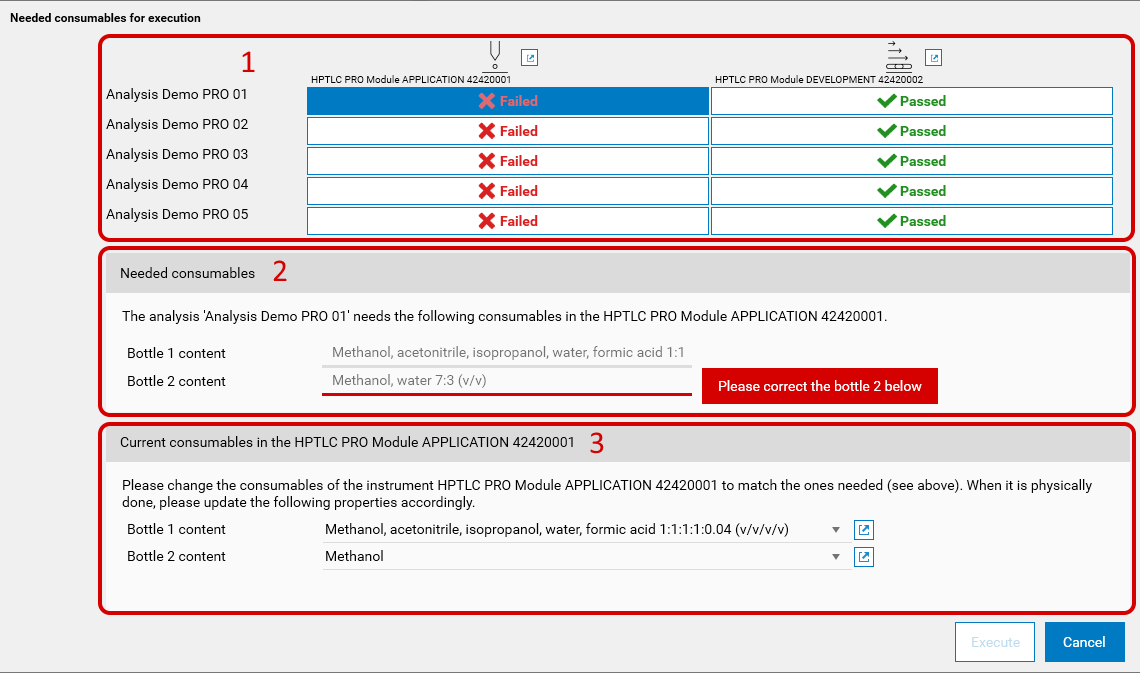
The view is made of three parts:
Step selection: a table view displays every step of each run (if more than a run is in the executing sequence). Steps are grouped by HPTLC PRO Module and make the columns of the table. Each run is displayed as a row in the table, named by the analysis’ name. Only one step of one run can be selected at one time, and it will change the view below. The steps with issues are marked as Failed, the others as Passed.
Needed consumables: All consumables needed for the above selected step will be displayed here. The matching errors are displayed in red.
Note
The needed consumables are readonly as they are defined in the analysis.
Current consumables of the HPTLC PRO Module: here, the declaration of HPTLC PRO Module’s consumables can be modified. It should match the needed consumables above.
Important
Current consumables (and instrument properties) is only declarative. visionCATS is not able to detect the content or volumes of the bottle. The user is responsible of first changing the consumables on the HPTLC PRO Module, and then updating the declaration in visionCATS.
Vial position in HPTLC PRO APPLICATION’s rack
With a HPTLC PRO Module APPLICATION, when adding a run to a sequence (see HPTLC PRO), the rack positions are automatically assigned to vials. The rack is filled from column A to E and from row 1 to 15 (so A1, A2… A15, B1, B2… E15).
If some vials are reused from one run to another, the vial positions are reused and the volumes are adjusted.
If a run is aborted, the vials are removed from the rack, but the other vials positions remain unchanged. So it is possible to have some “holes” in a rack, and these holes will be filled in priority if a run is then added to the sequence. Select one of the A to E columns to see which vial must be placed in which position before the execution.
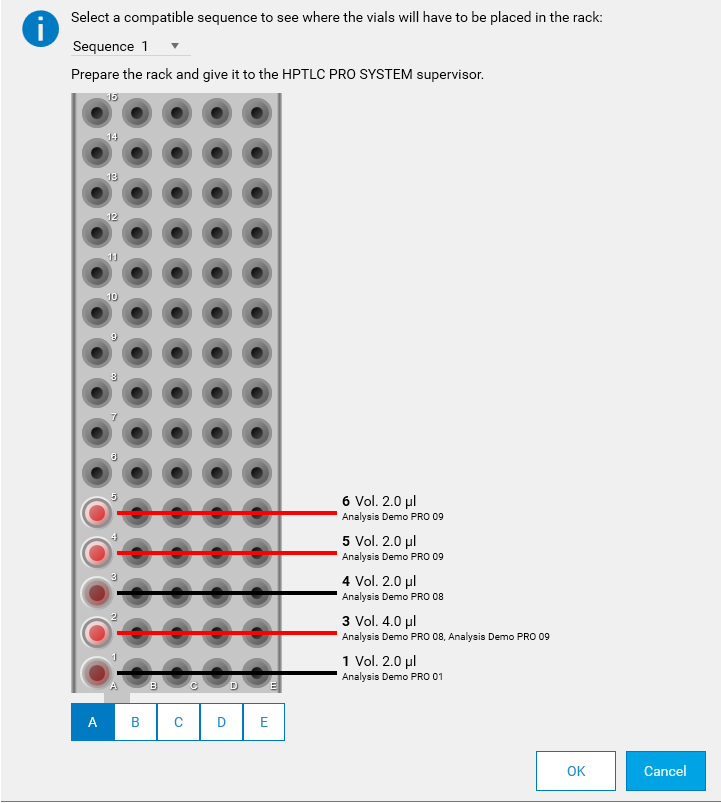
Note
The vials of the current run are highlighted to show where they are placed.
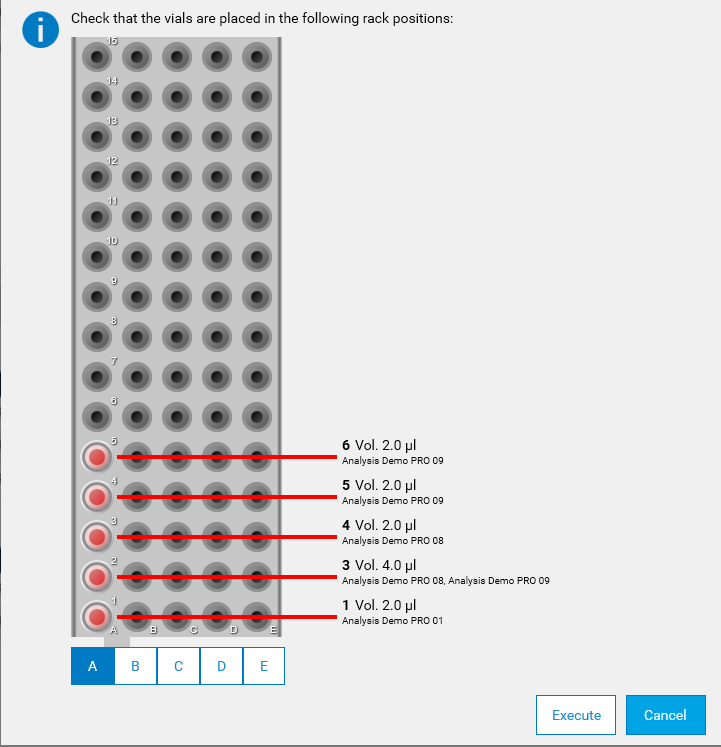
After correcting all the consumables issues, and validating the Needed consumables for execution popup, another popup displays how to the rack must have been filled. Select one of the A to E columns to see which vial must have been placed in which position before the execution.
Setup
To use HPTLC PRO Modules, a setup procedure should be followed:
Put each HPTLC PRO Module in place, and link them together to for a physical HPTLC PRO SYSTEM. The recommend order, from left to right, is:
HPTLC PRO APPLICATION
HPTLC PRO DEVELOPMENT
Connect all cables and hoses to the modules (current, USB, air, extraction, etc.)
Connect the whole HPTLC PRO SYSTEM via USB to a PC with a HPTLC PRO Instrument Service
Start visionCATS, with an user being a HPTLC PRO administrator
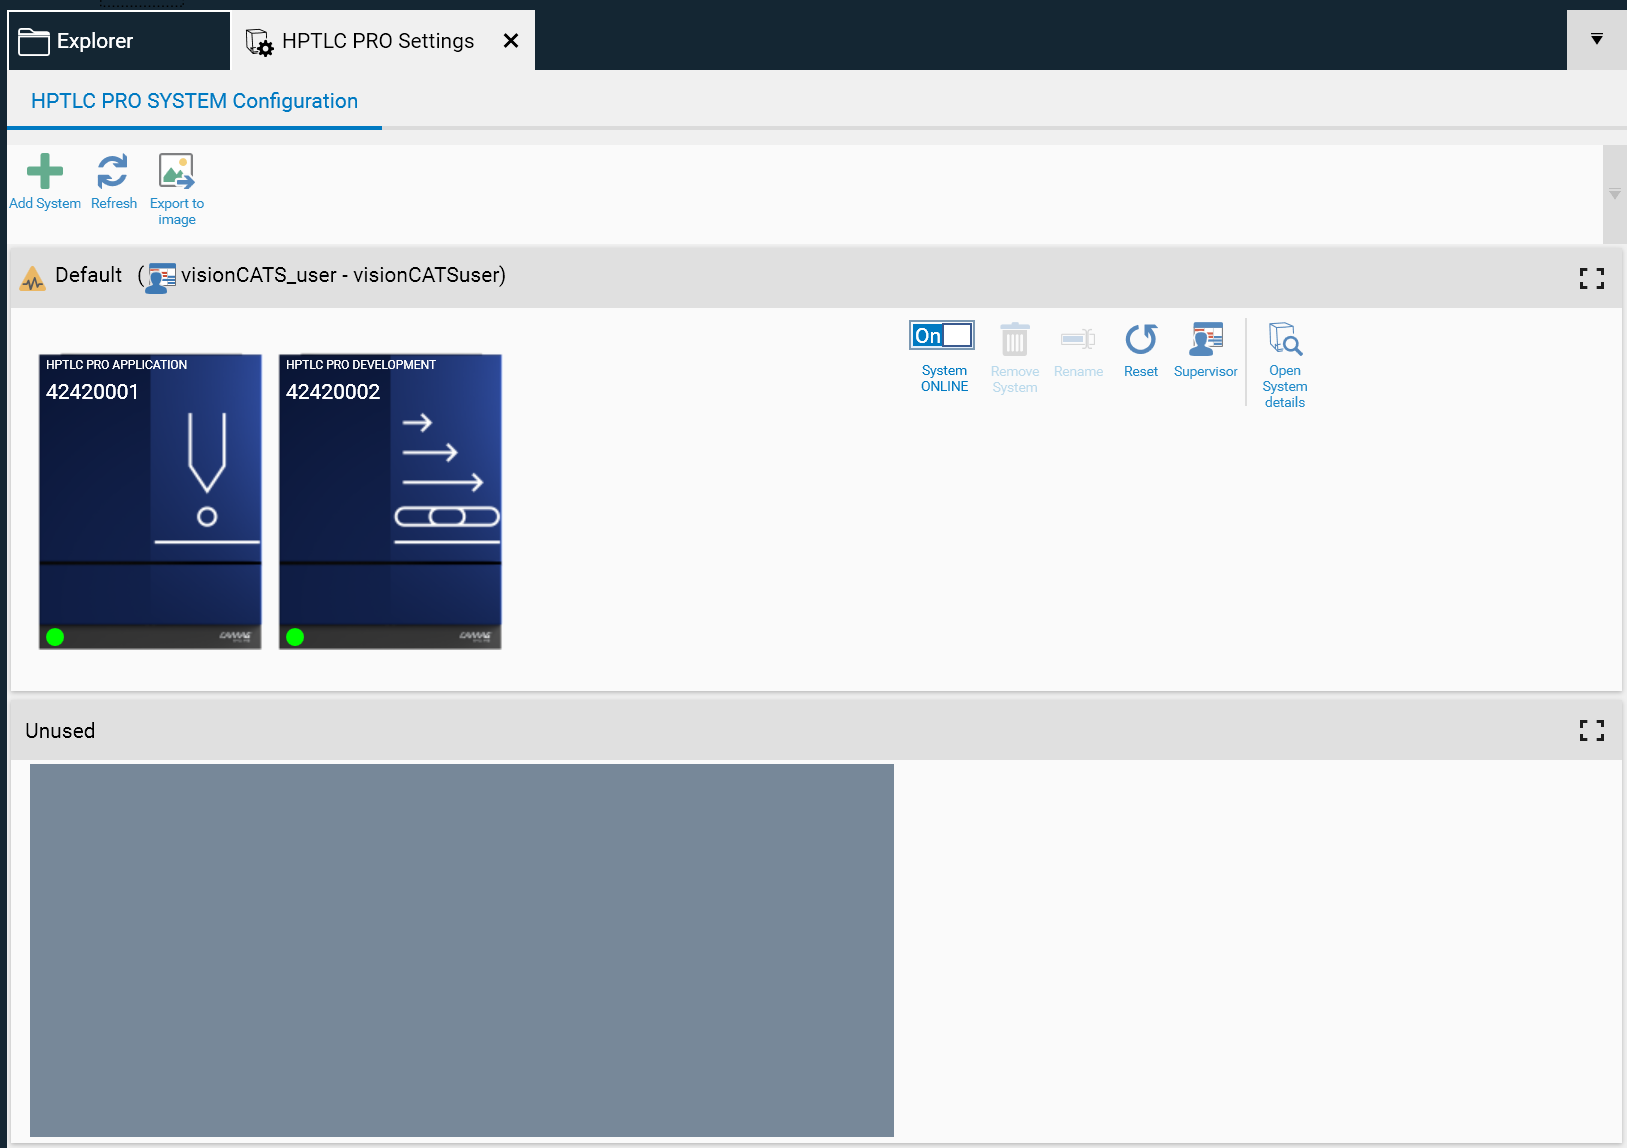
Open the HPTLC PRO SYSTEM Configuration window
All the newly installed HPTLC PRO Modules should be in the Unused HPTLC PRO SYSTEM row

Drag each HPTLC PRO Module’s icon on the Default HPTLC PRO SYSTEM row (or any other HPTLC PRO SYSTEM already created in visionCATS). Take care to place them in the same order than the physiscal modules.
Important
HPTLC PRO Module can only be dragged over offline HPTLC PRO SYSTEM (mareked with a gray background).
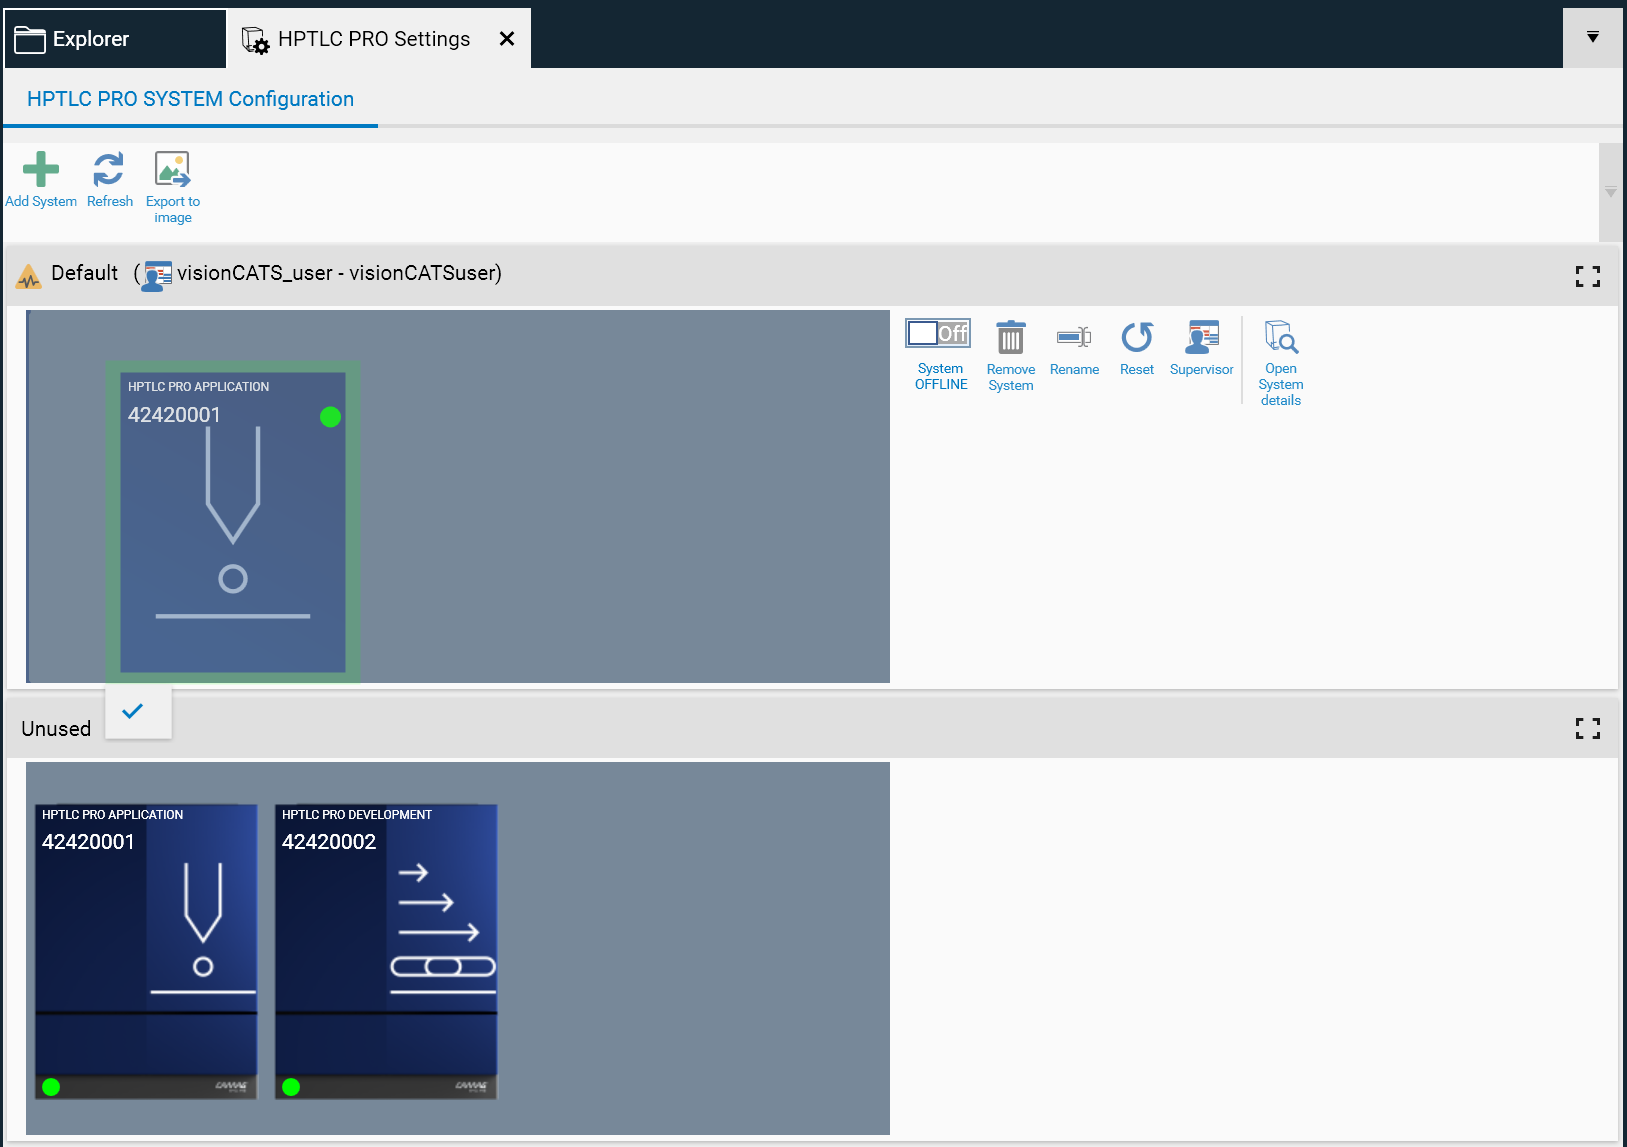
Enable the HPTLC PRO SYSTEM, the initialization will automatically start. See Understanding the HPTLC PRO Module and HPTLC PRO SYSTEM initialization.
Now the HPTLC PRO SYSTEM can be used
Typical execution
A normal user execute a method, or define himself steps using HPTLC PRO Module (see HPTLC Steps and Chromatography)
He then adds the run to one HPTLC PRO SYSTEM’s sequence (see Instructions for HPTLC PRO)
The HPTLC PRO SYSTEM Supervisor of the selected HPTLC PRO SYSTEM will receive a notification of the request (if Notifications are enabled, and if he has the corresponding notification enabled, see User Options Notifications)
When the HPTLC PRO SYSTEM Supervisor has verified that he should start the run (any previous running sequence finished, other runs using same consumables already in the sequence, etc.), he will select the run (with some others if wanted) in HPTLC PRO SYSTEM Details, and click on the execute button of the sequence.
If needed, he can change the execution order inside the sequence
The HPTLC PRO SYSTEM Supervisor has to confirm that every consumables are indeed available in the HPTLC PRO Modules, see Consumables check
The run(s) will then automatically start
The HPTLC PRO SYSTEM Supervisor should manually load or unload the carrier(s) when requested
The HPTLC PRO SYSTEM Supervisor and the requesting user receive notifications when the run is finished (if Notifications are enabled, and if they have the corresponding notification enabled, see User Options Notifications)